Monty B's hull strengthening programme
A bit of background here: in February 2008 we noticed that our hull had an indentation on either side which had, most likely, resulted from our rig being over-tightened before we left Greece combined with the heavy weather that we experienced on our journey from Greece to Montenegro in December 2007 (see blog entries http://yachtmontyb.blogspot.com/2008/03/potential-nightmare-scenario-1.html and http://yachtmontyb.blogspot.com/2008/03/right-place-right-time-right-people.html)
We were extremely concerned when we noticed the damage and were initially told that we wouldn't be able to sail in anything other than light winds until the hull was strengthened. In the spring, a second authoritative opinion was that the problem was nothing like as bad as it appeared and it was merely one of the batons in the hull that had warped slightly. This turned out to be true in the end, but the indentation is not a good thing and we want the peace of mind that Monty B is a truly strong sea-boat that will last last many more years which is why we decided to go ahead with the work.
So we took it pretty easy over the summer, sailing in nothing over a F4, with the expectation that the help that was offered to us by the local boatyard back in Feb, would materialise in the autumn. It didn't. All very Montenegrin.
But we struck lucky once again when a good friend of ours, Tony, who is a master of all things maritime and a trained chippy, offered in his rare moments of spare time to help us do it ourselves. We had consulted many casual experts on a way forward with this and Tony's plan, to create two new wooden ribs and a stringer made a lot of sense to us novices and looked achievable. Little did we know how much work would be involved at that point. Tony spent his precious days off his stressful day-job, working his chippy and boat-building magic.
So the work began in February.
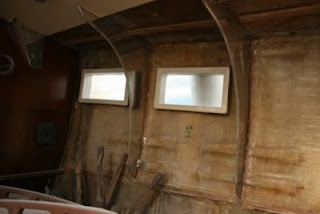
We started by stripping out the entire saloon. The moulded seating had to be cut out, all the wooden supports and panelling and ceiling panels were removed which was no mean feat. Then the beginning of the truly messy tasks began with sanding down the fibreglass in the areas of the hull where our new ribs were going to be fitted. This took in the region of 8 person days and resulted in the first picture below. The supports you can see are steel ribs which are chainplates for the shrouds and you can also see the glassed-in steel batons that support the hull. It was the lower baton that had warped slightly causing the hull indentation.
The second stage involved cutting some difficult to track down marine ply for the ribs and stringer. This alone took two weekends. The result is the second picture below. This shows our port side with the newly built wooden ribs (the verticals) and new stringer (the horizontal) which provide exceptional strength to the hull. The new ribs were glued in using West System epoxy (another 10 extremely dull pages could be written on the trials and tribulations of getting our hands on that stuff, here in Monte).


The next stage was to glass in the entire structure then fair the visible parts of the rib. This is the part of the tale where we learnt how bloody noxious epoxy can be as during day 5 of exposure, I was dizzy and sick. Burping epoxy is never a good sign. Unfortunately, it had pissed it down most days whilst we were working so it was hard to ventilate the area. I stupidly only used a ventilator on day 5 after discussing how I was burping up epoxy with an Aussie superyacht skipper a few nights previously in the pub (I am nothing but a classy chick). Ironically, this is when I got sick.
Anyway, a week later this was all done and we vowed never to do fibreglass work for more than two days at a time, ever again.


So, that was that. It was a huge job but the end result is that we now have an immensely strong sailing boat that we now have supreme confidence in. We are utterly indebted to Tony for his guidance, hard work, easy manner and giving up his precious free time to help us give Monty B a many more years of a happy life. Also many thanks to Laura, his fiancee, for giving up her man on so many weekends.
For us, the experience has been irreplaceable. We have learnt loads of new skills, it has built our confidence in many quarters and we now know a hell of a lot more about our boat. Seeing her stripped down to the barebones shows you what yachts are all about. Though I have to say, we are very, very glad to have finished.
We were extremely concerned when we noticed the damage and were initially told that we wouldn't be able to sail in anything other than light winds until the hull was strengthened. In the spring, a second authoritative opinion was that the problem was nothing like as bad as it appeared and it was merely one of the batons in the hull that had warped slightly. This turned out to be true in the end, but the indentation is not a good thing and we want the peace of mind that Monty B is a truly strong sea-boat that will last last many more years which is why we decided to go ahead with the work.
So we took it pretty easy over the summer, sailing in nothing over a F4, with the expectation that the help that was offered to us by the local boatyard back in Feb, would materialise in the autumn. It didn't. All very Montenegrin.
But we struck lucky once again when a good friend of ours, Tony, who is a master of all things maritime and a trained chippy, offered in his rare moments of spare time to help us do it ourselves. We had consulted many casual experts on a way forward with this and Tony's plan, to create two new wooden ribs and a stringer made a lot of sense to us novices and looked achievable. Little did we know how much work would be involved at that point. Tony spent his precious days off his stressful day-job, working his chippy and boat-building magic.
So the work began in February.
We started by stripping out the entire saloon. The moulded seating had to be cut out, all the wooden supports and panelling and ceiling panels were removed which was no mean feat. Then the beginning of the truly messy tasks began with sanding down the fibreglass in the areas of the hull where our new ribs were going to be fitted. This took in the region of 8 person days and resulted in the first picture below. The supports you can see are steel ribs which are chainplates for the shrouds and you can also see the glassed-in steel batons that support the hull. It was the lower baton that had warped slightly causing the hull indentation.
The second stage involved cutting some difficult to track down marine ply for the ribs and stringer. This alone took two weekends. The result is the second picture below. This shows our port side with the newly built wooden ribs (the verticals) and new stringer (the horizontal) which provide exceptional strength to the hull. The new ribs were glued in using West System epoxy (another 10 extremely dull pages could be written on the trials and tribulations of getting our hands on that stuff, here in Monte).


The next stage was to glass in the entire structure then fair the visible parts of the rib. This is the part of the tale where we learnt how bloody noxious epoxy can be as during day 5 of exposure, I was dizzy and sick. Burping epoxy is never a good sign. Unfortunately, it had pissed it down most days whilst we were working so it was hard to ventilate the area. I stupidly only used a ventilator on day 5 after discussing how I was burping up epoxy with an Aussie superyacht skipper a few nights previously in the pub (I am nothing but a classy chick). Ironically, this is when I got sick.
Anyway, a week later this was all done and we vowed never to do fibreglass work for more than two days at a time, ever again.
Then, it took six days for Tim to reconstruct the saloon while I sorted out the rest of the boat, ready for moving back in. I have to hand it to the lad: he takes perseverance to a whole new level. Almost every single element of the saloon had to be recut to take account of the new ribs and stringer - and the most hair-tearing out moment came when the fibreglass seat mouldings touched the stringer itself - so some of the new stringer had to be planed back. Aghhhhh! (It was at this point that I got told not to come back to the boat until I calmed down).
The pics below show the saloon put back together. The only visible part of the new structural support are the painted white ribs, running parallel with the steel ribs, which actually look quite good in the flesh.
The final pics are our beloved Monty B back to being our home again.


So, that was that. It was a huge job but the end result is that we now have an immensely strong sailing boat that we now have supreme confidence in. We are utterly indebted to Tony for his guidance, hard work, easy manner and giving up his precious free time to help us give Monty B a many more years of a happy life. Also many thanks to Laura, his fiancee, for giving up her man on so many weekends.
For us, the experience has been irreplaceable. We have learnt loads of new skills, it has built our confidence in many quarters and we now know a hell of a lot more about our boat. Seeing her stripped down to the barebones shows you what yachts are all about. Though I have to say, we are very, very glad to have finished.

Comments